How to restore a deleted, formatted or corrupted partition
There are two basic approaches for restoring all volume data:
- Physical recovery of the boot sector and partition table (in-place recovery)
- Copy all data to a new safe location (to another attached or external physical disk)
First option (in-place recovery) works best when the partition/volume was just deleted, or the data and the file system on deleted/re-created/re-formatted partition have not been severely damaged (overwritten). In this case the recovery process is very fast, and you'll be able to access your files using Windows Explorer (or any other program) immediately after recovery. However, if some data overwriting occurred, or damage to the file system took place, Windows might not recognize the recovered volume (a drive with an assigned letter does not appear), or you may get messages like "Drive is not accessible". In this case you should try the second option: copy all existing data from the corrupted volume to a new physical disk.
There are other scenarios when you do not want to recover your data in-place. You just want to restore all live (non-deleted) volume data (files and folders) to another media in a single operation. Possible scenarios when this is applicable:
- USB Flash or Camera Memory Card is damaged or formatted
- Hard Disk has some physical damage (unreadable or bad sectors)
- Volume boot sector is damaged by virus or power surge and volume becomes unreadable (inaccessible)
- Partition or volume has been formatted accidentally
- RAID Disk Array crashed and needs to be re-built
Copying All Volume Data to another Location
This approach is the safest way to get all your data backed up to a new safe place (storage), however this is also the slowest way. You keep your original damaged disk (all data on it remains untouched), and just copy all your valuable information to a dedicated attached HDD/SDD, external USB Disk or USB Flash Card. The copy process itself could take a long time, especially in cases where you have terabytes of data (videos or photo archives).
To Copy All Volume Data to a New Disk:
-
In Active@ Partition Recovery, use QuickScan or SuperScan to detect a deleted partition, verify its content and select the deleted partition node.
-
To open the Recovery Options dialog box, use one of the following methods:
-
Click Recover on the toolbar:

-
Right-click the partition, and then choose Recover from the context menu
-
Execute the Recover command from Tools menu
-
Press Ctrl+R key combination
-
-
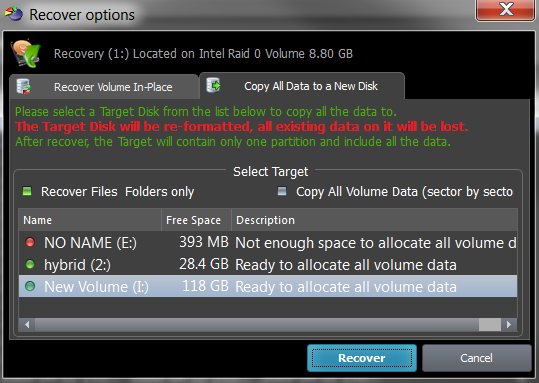
Make sure Copy All Data to a New Disk tab is active:
-
Select a recovery method:
- Recover Files & Folders only - copies all safe files and folders from the partition being recovered to a new target disk. Original data structure (location of files and directories in folder's tree) and file's attributes (creation date, read-only flag, etc..) have been duplicated as well. Advantage of this method is that copied files are guaranteed to be readable (accessible) on a new target. Disadvantage is that system areas, meta-data and deleted data are not copied, so future data recovery of damaged file system is not possible on a new target.
- Copy All Volume Data (sector by sector copy) - copies all occupied sectors on the volume as it is specified in file system's allocation bitmap. This means than all system areas (like MFT records, or FAT tables) have been duplicated as well, and along with safe files and folders you can recover files being marked as deleted as well, so future data recovery is possible even from the new disk (target). This can be considered as a significant advantage. Disadvantage is that if some system areas (for example MFT, or boot sector) on the found partition are damaged, target disk will have exactly the same damaged data, and when accessing the new volume, or files on it, you can get error messages, like "access denied".
-
Select a designated disk (having enough storage space) to copy all of your data to (target). A list box displays all available disks in the system, excluding physical disks where the currently running operating system is installed. You can plug-in more disks (or remove some of them them) and the software should detect and display them here immediately. Make sure you select a proper target disk, as before the data copying occurs it will be formatted (all existing data, if any, will be lost)
-
Click Recover and wait while all volume data is copied to the new destination
After completion Windows Explorer should be launched and you can access and inspect your data at the new location.
Important! Copy All Data to a New Disk command re-formats the target disk, destroying all data on it, before all data being copied to. Be careful and select a proper target disk, which doesn't contain anything important!
Restoring a deleted/damaged volume in-place
This approach is the fastest way to return your volume "back to life" in the place where it resided originally. However this could be a dangerous and non-guaranteed method. Recovery of partition information, volume boot sector and partition table usually takes only a couple seconds. However, you need to be absolutely sure that you recover a proper volume, and recovery is successful only when file system itself has not been damaged previously.
This way works best when you just deleted a volume, realized the problem, and immediately started the recovery process. In this case not many data overwrite operations occurred within the Windows environment, so most of your data structures would not have been damaged.
In case if you formatted the disk and installed a new OS, or copied some files to a newly formatted partition, you may still try this approach. However, chances that some critical file system data structures have not been damaged are low, and most likely Windows would not be able to access a logical disk after recovery and you will see something like: "Volume is not accessible or damaged" and "Do you want to format the volume?", and you'll need to delete this invalid partition and try another approach. To evaluate your chances for successful physical recovery (in-place recovery), take a look at the icon besides the found volume. You can distinguish deleted partitions from existing ones by the icons:
You can distinguish deleted partitions from existing ones by the icons:
 Grey icon shows an existing partition or drive visible in Windows Explorer
 Green icon shows live drive in SuperScan results (having a letter assigned)
 Grey icon with green mark shows a deleted partition with an excellent integrity status. This means the chances for successful in-place recovery are good
 Grey icon with brown mark shows a deleted partition with an acceptable integrity status. This means that there is some chance for successful in-place recovery
 Grey icon with red mark shows a deleted partition with Poor integrity status. However this partition might have been formatted before deletion or has some other damage, so there are minimal chances of successful volume recovery in-place
To restore a deleted, damaged or reformatted partition:
-
In Active@ Partition Recovery, use QuickScan or SuperScan to detect a deleted partition, verify its content and select the deleted partition node.
-
To open the Recovery Options dialog box, use one of the following methods:
- Click Recover on the toolbar:
- Right-click the partition, and then choose Recover from the context menu
- Execute the Recover command from Tools menu
- Press Ctrl+R key combination
- Click Recover on the toolbar:
-
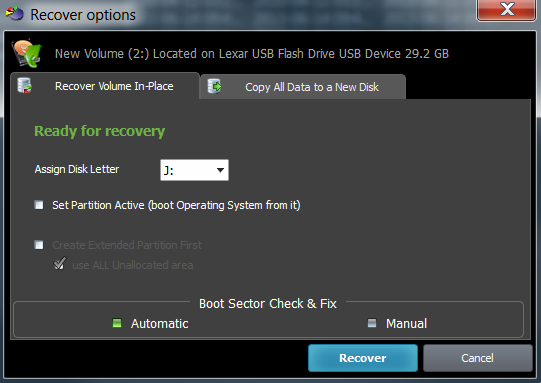
Make sure Recover Volume in-Place tab is active:
-
To assign a partition to be recovered and assigned a non-default disk letter, you may choose one of available letters from the drop-down box
-
To mark a partition to be recovered as Active, you may check the related check box. Be careful! If you mark a partition as active, and it does not contain system files on it for the booting process, your computer might not boot properly. So mark it as an Active partition only when you are 100% percent certain that the partition being recovered had an Active status before deletion
-
In some cases partition being recovered seems to be not a Primary type, but the Logical Disk in an Extended partition. In this case Create Extended Partition First option will be available (if no Extended partition exists on the disk). Keep it turned on if you want to create Extended partition container first, and then place your recovered partition inside. If the option use ALL Unallocated area is turned off - the Extended partition (container) will have the same size as partition being recovered. Otherwise the Extended partition (container) will occupy all of the unallocated space on the disk
-
You have an option to execute either Automatic or Manual recovery to check and fix the Volume Boot Sector. If you are not familiar with low-level disk structures, use the Automatic mode. If you know a lot about sectors, clusters, FAT, MFT, etc.. you can choose the Manual mode to check the parameters manually and to select the most appropriate action
-
Click Recover.
After the recovery process is complete, a confirmation message pops up. Make sure that the results are correct by verifying the contents of the recovered partition in the Windows Explorer. Recovered partition should appear there after you refresh its content.
Manual mode for Volume Boot Sector Recovery
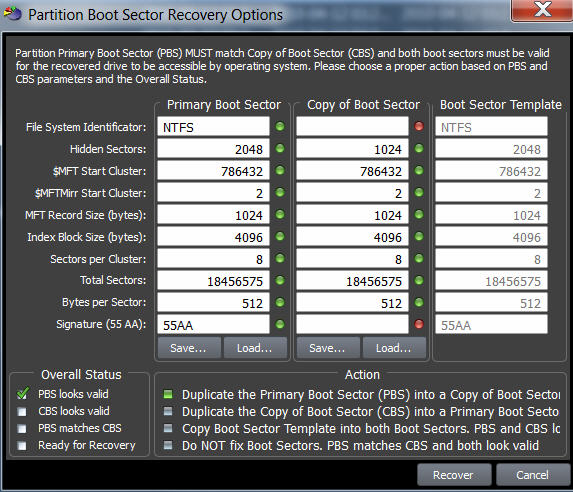
If you've chosen Manual mode for the Boot Sector Check & Fix, a dialog similar to the one above appears.
You can:
-
Verify the parameters of the Primary and Copy of Boot Sector located on the disk. Parameters that appear to be invalid are marked with a red mark. Boot Sector Template column is formed programmatically and contains the most appropriate parameters for the partition found
-
You can Save the raw data from the Primary Boot Sector or Copy of Boot Sector to a file in order to be able to analyze these raw values in Hex Editor or third party software, or restore them back if recovery is unsuccessful
-
You can Load raw data from the Primary Boot Sector or Copy of Boot Sector from a file to restore them back after unsuccessful recovery
-
See the Overall Status of both Partition Boot Sectors (their validity and if they match)
-
Choose an Action to execute for the Boot Sectors while the partition is being recovered:
- Duplicate the Primary Boot Sector into a Copy of Boot Sector - if you are sure that Primary Boot Sector is valid, but Copy is not
- Duplicate a Copy of the Boot Sector into a Primary Boot Sector - if you are sure that the Copy of Boot Sector is valid, but Primary is not
- Copy the Boot Sector Template into both Boot Sectors - if both Primary and Copy of Boot Sector look invalid
- Do NOT fix Boot Sectors - if both Boot Sectors look valid and match each other and the Boot Sector Template values.
In the example above, even you are not a specialist - you can notice that Copy of Boot Sector contains some garbage (i.e. damaged) data. Red marks appear next to the corrupted fields, so the most appropriate action is to Duplicate the Primary Boot Sector into the Boot Sector Copy.
Important! The Recover and the Fix Boot Sector commands automatically log the old information to the partition backup file, and you can always rollback the changes later on.
Note: Recover Deleted Partition function is available in commercial (purchased) version only.